How to Add a Hole to a Leather Belt Without a Punch Tool
How to Add a Hole to a Leather Belt Without a Punch Tool
Quick answer: You can add a clean extra hole to a leather belt at home in about five minutes — without a leather punch. Mark the spot exactly in line with the existing holes, set the belt on a solid wood block, and rotate a sharp metal awl, nail, or small Phillips screwdriver through the leather while spinning it. Finish by smoothing the edges with leather conditionertps://stridewise.com/leather-conditioning-mistakes/" target="_blank" rel="noopener noreferrer">conditioner. The trick is patience and a sharp tool — not a hammer.
Last updated: May 2026 • By BELTLEY Editorial
TL;DR:
- Mark first — line up with the existing holes exactly, measure the spacing.
- Use a sharp metal point — awl, nail, or small Phillips screwdriver.
- Spin, don't hammer — rotate the tool to bore through cleanly.
- Finish with leather conditioner to seal the new edge.
A belt that's one notch off is one of the most common annoyances in menswear — you bought it sized correctly, but weight, layering, or a stretched-out hole has put you between sizes. The good news is you don't need a $40 leather punch tool to fix it. With a sharp metal point, a wood backing block, and five careful minutes, you can add a clean, professional-looking hole to a full-grain belt at home. Below is the safest method and the three mistakes that ruin belts. If you're looking at the belt and wondering whether it's worth repairing in the first place, read how to tell if a belt can be restored or tossed.
What tools do you actually need?
You only need three things. A sharp metal point (an awl, a finishing nail, a small Phillips screwdriver, or a thin metal skewer all work), a solid wood backing block to drive the point into, and a ruler. That's it. A hammer is optional and usually causes more damage than it solves on full-grain leather.

The sharper, the cleaner. An awl is a small pointed hand tool used for marking surfaces or piercing leather and other materials — and it's the best home option because it's purpose-built. A finishing nail is a fine fallback. Avoid anything blunt; you want a tool that pierces fibers, not one that tears them. We make the same belts in our full-grain leather belts collection that will respond beautifully to a careful home hole.
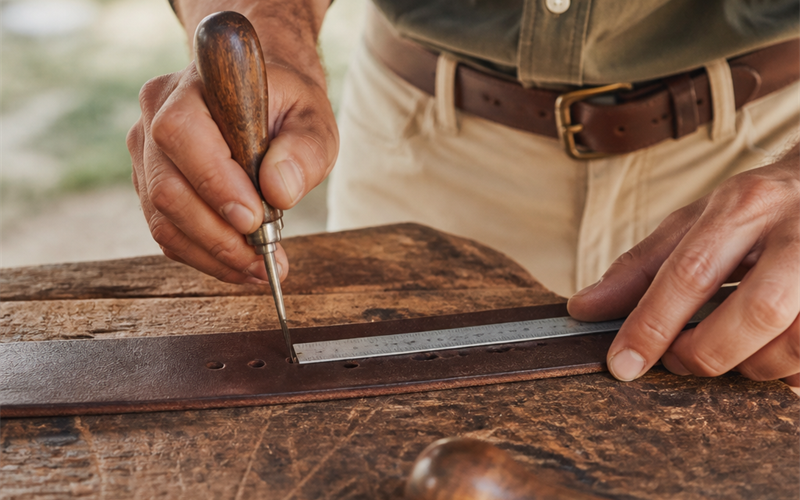
How do you mark the new hole position?
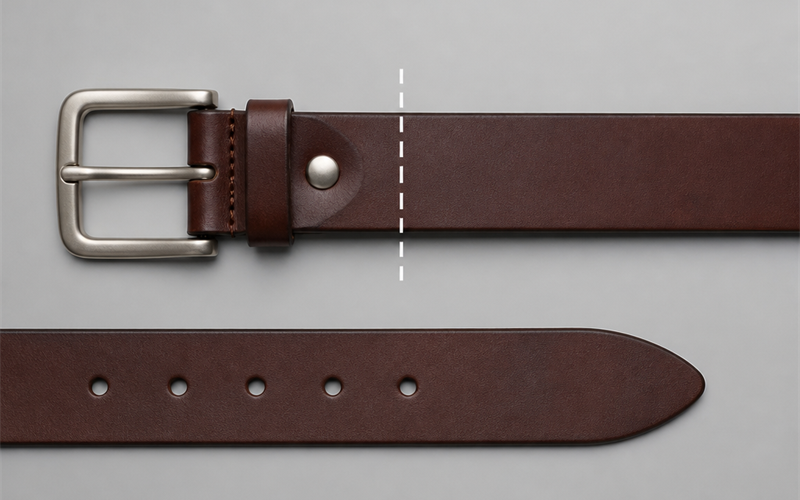
Line it up perfectly with the existing holes. Use a ruler to measure the distance between the existing holes (usually about 25mm or 1 inch), then mark the new position with a pencil dot or a light scratch from your awl. The new hole must sit on the same centerline as the existing row, or it'll look obviously homemade.

Precision here decides the outcome. Lay the belt flat on a hard surface, eyeball or measure that the existing holes form a perfectly straight line down the strap's center, then place your mark the same spacing from the last hole. If you're filling a gap between two existing holes for a finer fit, see our companion guide on how to punch a hole between two existing holes. A belt with seven evenly spaced holes — like most of our men's belts — makes alignment easy because the row is already obvious.
How do you actually make the hole?
Spin a sharp metal point through the leather. Place the belt on a solid wood block (an old cutting board works), position the marked spot over the wood, and press the sharp tip of your awl or nail straight down into the mark. Now rotate the tool back and forth like a tiny drill — about 30 seconds — while applying steady downward pressure. The tip will push through cleanly, leaving a round hole.
The spin is the whole secret. A pure stab or a hammer-blow tends to tear an uneven hole and stretch the leather edges. Rotating the point cuts the fibers cleanly the same way a drill works against wood — which is why awls have always been the leatherworker's tool of choice. Push from the grain side (the smooth outside) toward the flesh side (the backing), so any tearing happens on the hidden inner surface.
Key stat: Full-grain leather is roughly 4–6mm thick on most quality belts — which is why a spinning awl gets through it in under 60 seconds with steady pressure, while a hammered nail typically takes longer and leaves a torn rim.
What's the right hole size?
About 4–5mm (roughly 3/16"). Match the size of your existing holes by eye — most leather belts use a 4mm or 5mm prong. The new hole only needs to be just slightly larger than the diameter of your buckle's prong, with enough room to slide on smoothly.

Slightly small is better than slightly large. A snug hole keeps the prong from sliding loosely and prevents the leather from stretching out at that notch. If your awl makes a smaller hole than you need, you can carefully widen it by rotating the tool a few more turns or by stepping up to a slightly thicker point. Don't oversize it — once the hole is too big, you can't shrink it back.
Hole-adding cheat sheet
| Step | What to do | Tool |
|---|---|---|
| 1. Measure | Match existing hole spacing | Ruler |
| 2. Mark | Pencil dot on the centerline | Pencil / awl tip |
| 3. Back the belt | Set on solid wood block | Cutting board |
| 4. Pierce | Press sharp point into mark | Awl, nail, screwdriver |
| 5. Spin | Rotate tool 30 sec under steady pressure | Same tool |
| 6. Finish | Condition the new edge | Leather conditioner |
How do you finish the new hole cleanly?
Smooth and condition. Once the hole is pierced through, use the awl tip to round the inside edges by spinning it in both directions for a few more seconds. Then rub a tiny amount of leather conditioner around the rim with your finger to seal the cut fibers and prevent fraying. Let it sit for 10 minutes before using.

The finish matters more than people think. A raw cut fiber edge will wick moisture and fray over time, which is why every professional-quality belt — including the ones in our handmade collection — has burnished or sealed edges. We cover home care fundamentals in our leather care guide. Conditioner closes the new edge the same way it conditions the rest of the strap.
What mistakes ruin the belt?
Three things. (1) Hammering — driving a nail through with a hammer tears leather and crushes the surrounding fibers. (2) Off-center marking — even a 2mm offset looks obviously homemade once the belt is on. (3) Punching through stitching — if your belt is double-layered or stitched, punching through a stitch line can unravel the construction. Avoid the seam.

Skip the hammer, skip the rush. A spinning awl gives a clean, round, professional-looking hole; a hammered nail rarely does. If your belt is a stitched, double-layered piece — like our double layer belts — make sure your new hole sits in the same row as the originals and well clear of any cross-stitching. The original holes are almost always positioned in a stitch-free zone for exactly this reason.
The Bottom Line
Adding a hole to a leather belt without a punch tool is a five-minute job if you do it right: measure the spacing, mark the centerline, spin a sharp awl or nail through clean wood-backed leather, and seal the edge with a touch of conditioner. Skip the hammer, skip the guesswork, and you'll end up with a hole that looks like it came from the factory. At BELTLEY, every belt ships with seven evenly spaced, hand-finished holes designed to keep you out of DIY territory in the first place — full-grain leather, stainless or solid brass hardware, and a 10-year warranty. Ready for a belt that's already sized right? Browse our full-grain leather belts or men's collection.
Frequently Asked Questions
Q: Can I really add a hole to a leather belt without a leather punch?
Yes — an awl, finishing nail, or small Phillips screwdriver works fine on full-grain leather if you spin the tool through instead of hammering it. The result is a clean, round hole that's nearly indistinguishable from a punched one.
Q: Will adding a hole damage the belt?
Not if you do it cleanly. A spinning sharp point separates leather fibers without tearing them, and a quick rub of conditioner seals the new edge. A hammered nail or a dull tool can crush fibers and leave a frayed rim that wicks moisture.
Q: How big should the new hole be?
Roughly 4–5mm — match the size of your existing holes by eye. The hole needs to be just slightly larger than your buckle's prong. Err on the slightly smaller side; you can widen a tight hole, but you can't shrink an oversized one.
Q: How do I avoid making the hole look obviously homemade?
Two things: align it perfectly on the same centerline as the existing holes, and match the spacing to the existing intervals (usually about 25mm). A 2mm offset or uneven spacing is what gives DIY holes away.
