How to Re-Stitch a Loose Belt Loop at Home
How to Re-Stitch a Loose Belt Loop at Home
Quick answer: To re-stitch a loose belt loop (the leather keeper that holds the tail down), use a saddle stitch with two needles, waxed thread, and an awl. Pierce new pilot holes through the existing stitch line on a wood block, then pull both needles through each hole in opposite directions until the loop is secure. The whole repair takes about 20 minutes and lasts years — longer than any glue or super-glue shortcut.
Last updated: May 2026 • By BELTLEY Editorial
TL;DR:
- The fix is a saddle stitch — two needles, waxed thread, hand-pulled in opposite directions.
- Match the existing holes — don't punch new ones in a different row.
- Use waxed polyester or linen thread in a color that matches the original.
- Glue is not a fix — it'll fail in months. Stitch it properly.
A loose belt loop is the most common belt repair in any closet — the keeper that holds your strap tail down works its way free, and suddenly the tail flaps around. Most people reach for super glue, which holds for about three weeks before failing. A proper hand saddle stitch takes 20 minutes and survives for years. Below is the method, the materials, and the one mistake that ruins the look. If you're not sure your belt is worth the repair, see how to tell if a belt can be restored.
What is a belt "loop" and why does it come loose?
The loop is the keeper — the small leather ring that holds the loose tail of the belt against the strap. Most belts have one fixed keeper sewn in at the buckle end, and many also have one movable keeper that slides on the strap. Both are stitched in place. They come loose because the original thread is usually a single machine stitch, and a single broken thread unravels the whole loop fast.

The construction is the weak point. Factory belts run a fast single-pass stitch through the keeper because it's quicker on a production line — but a single thread is the whole structure. When one strand snaps, the whole loop falls apart. A hand saddle stitch uses two threads pulled in opposite directions, so even if one breaks, the other still holds. That's why proper saddlery — including our handmade belts — uses saddle stitching wherever it counts.
What's a saddle stitch and why is it the right fix?
A saddle stitch is a hand-sewing technique that uses two needles on one piece of thread, pulled through each hole in opposite directions. It produces an interlocked stitch that doesn't unravel when a single strand breaks — the gold standard in leather work and the reason saddle stitching shows up in everything from horse tack to luxury wallets.

The lock is the whole advantage. Machine stitching loops thread through itself, so cutting one thread unravels the entire seam — the very failure mode that wrecked your keeper. A saddle stitch's two-thread interlock prevents that domino effect. We use saddle stitching in much of our full-grain leather belts collection because it's the only stitch worth doing if you want the belt to last a decade.
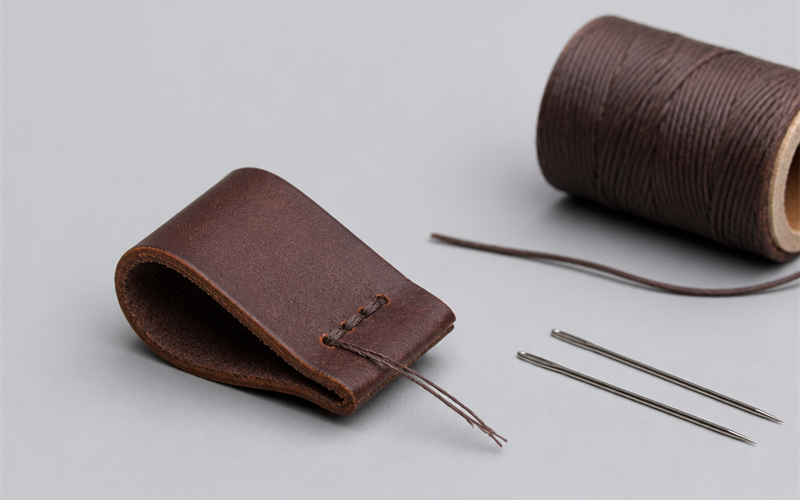
What materials do you actually need?
A short list. (1) Two saddler's needles (blunt-tipped harness needles, sizes #2 or #3). (2) Waxed thread — polyester or linen, ~0.6mm thick, in a color matching the original. (3) A pricking iron, stitching chisel, or sharp awl for pilot holes. (4) A wood block to back the leather. (5) Optional: a stitching pony or clamps to hold the work. Total: about $10 of supplies you'll keep for life.
The right needle matters. Saddler's harness needles are blunt-tipped on purpose — they slide through pre-pierced holes instead of cutting new ones, so the leather stays clean. A standard sewing needle will tear leather fibers and weaken the line. Waxed thread is also non-negotiable; the wax locks the stitch and resists abrasion. If you're missing supplies, any saddlery or leather-craft supplier carries the basic set for under $15.
Key stat: A hand saddle stitch can survive a single broken thread without unraveling — the stitch line stays intact. A machine lock stitch fails entirely if one thread is cut, which is why factory belt loops are the #1 failure point on cheap belts.
How do you actually re-stitch the loop?
Six steps. (1) Remove the broken thread — pull out any loose ends from the failed stitch. (2) Position the loop — slide the keeper into its original spot and clamp the assembly between the buckle end's leather layers. (3) Pre-pierce — use the existing stitch holes if they're intact; if not, mark new holes 3–4mm apart along the same line with your awl. (4) Wax-thread both needles — thread a needle on each end of a thread piece roughly 4× your stitch length. (5) Saddle stitch — push needle A through hole 1 from one side, then push needle B through the same hole from the other side, then move to hole 2 and repeat, alternating until you reach the end. (6) Lock and trim — at the last hole, run both needles back through the previous hole to lock, then trim the ends and seal with a touch of beeswax or a tiny dab of clear glue.

The rhythm gets fast once you start. Each hole receives both needles, each from the opposite side, producing the interlock. Pull each stitch firm but not so tight that it puckers the leather. The whole keeper has 6–10 stitches on a typical belt, so the repair is over in 10–15 minutes once you're set up. Our leather care page has general belt care fundamentals if this is your first time doing leatherwork.
Saddle stitch step-by-step
| Step | Action | Detail |
|---|---|---|
| 1 | Remove broken thread | Pull out all loose ends |
| 2 | Position loop | Slide keeper into place; clamp |
| 3 | Pre-pierce | Use existing holes or awl new ones 3–4mm apart |
| 4 | Thread two needles | One on each end of a thread piece 4× stitch length |
| 5 | Saddle stitch | Both needles through each hole from opposite sides |
| 6 | Lock & trim | Back-stitch the last hole, trim, wax the ends |
Should you ever just use glue?
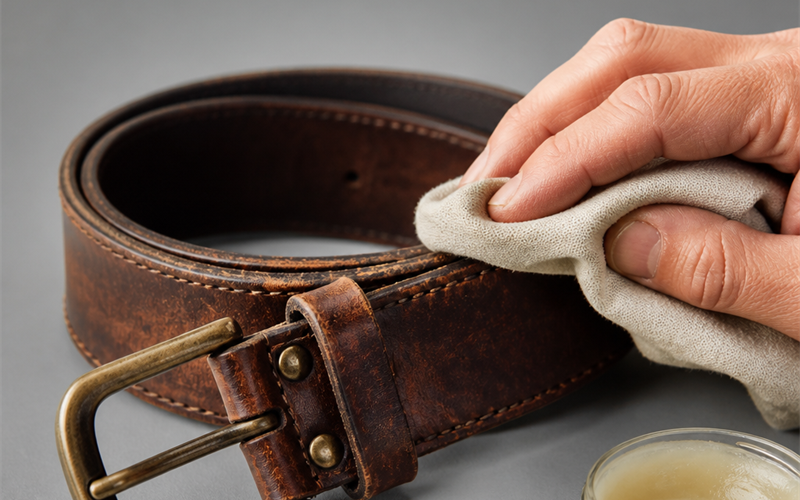
Almost never — it'll fail. Super glue and leather glue bond surfaces, not load-bearing seams, and a belt keeper takes constant friction and small tugs every time you put the belt on. The glue lasts a few weeks to a few months at most, then the keeper comes loose again. The only legitimate role for glue here is a tiny dab to lock the trimmed thread ends after a proper stitch.

The pattern is consistent across leather repair. Glue-only repairs are visible (the wrong sheen often shows), reversible failure modes (peels at the edges), and end up forcing a stitch repair anyway. Skip the shortcut. If you're not comfortable hand-stitching, take the belt to a cobbler — they'll re-stitch the loop for $5–$15.
What if the keeper itself is torn or missing?
Replace it, then stitch. If the loop's leather is split, frayed beyond use, or missing entirely, cut a replacement strip from scrap leather of similar thickness (or order a cheap keeper online). Wrap it around the strap in the original position, mark stitch holes, and saddle-stitch it in the same way as a normal repair. Match the leather color and grain as closely as possible.

A clean replacement loop looks factory-fresh. The trick is matching thickness — a thin keeper on a thick belt looks wrong, and vice versa. Our full-grain leather belts and casual belts all use proportional keepers; if you're rebuilding one from scratch, match the original dimensions exactly.
The Bottom Line
A loose belt keeper isn't a death sentence for the belt — it's a 20-minute saddle-stitch repair with $10 of supplies. Use two needles, waxed thread, and the existing stitch holes (or new ones along the same line), and you'll end up with a keeper that survives longer than the original factory machine stitch. Skip the glue shortcut; it fails within months. At BELTLEY, our belts are built with saddle-stitched keepers and full-grain leather specifically so the construction holds up to a decade of daily wear — and our 10-year warranty covers materials and construction. Ready for a belt that won't need this repair in the first place? Browse our full-grain leather belts or handmade collection.
Frequently Asked Questions
Q: Can I fix a loose belt loop with super glue?
Briefly, yes — for a few weeks. Glue isn't built for load-bearing seams under constant friction, so the keeper will come loose again. A proper hand saddle stitch takes about 20 minutes and lasts years.
Q: What thread should I use to re-stitch a belt loop?
Waxed polyester or linen thread around 0.6mm thick, in a color matching the original stitching. The wax locks the stitch in place and resists abrasion. Plain sewing thread frays and snaps fast.
Q: Do I need a leather-craft awl?
A sharp awl makes the job much easier, but a sharp finishing nail or a stitching chisel will also pre-pierce the holes. The key is matching the spacing (3–4mm apart) and staying on the original stitch line.
Q: How much would a cobbler charge to re-stitch a belt loop?
Usually $5–$15, depending on the shop. If you don't want to learn hand stitching, that's a reasonable price for a clean professional fix — especially on an expensive belt where mistakes would be visible.
,%20use%20a%20saddle%20stitch%20with%20two%20needles,%20waxed%20thread,%20and%20an%20aw...)